Open Banking Directory Usage - eIDAS release (Directory Sandbox) - v1.2
1. Version Control
| Version | Date | Author | Comments |
|---|---|---|---|
| DRAFT 1.0 | Open Banking Directory Team | Initial Release. This document supersedes the Open Banking Directory Usage (Directory Sandbox) document. | |
| 1.1 | Open Banking Directory Team | Updated document in 3.Getting Started Checklist: Certificate profiles updated with OpenSSL eIDAS PSD2 Certificate Signing Request Profiles v2.1. Updated Description and Example for the On Behalf Of item in 6. Create Software Statements. | |
| 1.2 | Open Banking Directory Team | Updated screenshot in 15. Creating and managing ASPSP Authorisation Servers to show new input field: API Resource Discovery Endpoint. Updated text in 16. Acquiring the List of ASPSP Authorisation Servers to highlight the new field: API Resource Discovery Endpoint. |
2. Introduction
The purpose of this How To Guide is for ASPSPs and TPPs who want to onboard their software with the Open Banking Directory Sandbox. It is aimed at Primary Technical Contacts (PTC) and Secondary Technical Contacts (STC).
This guide describes the technical steps for creating and maintaining Software Statements, access tokens and ASPSP authorisation servers on the Directory Sandbox environment of the Open Banking Directory.
This guide is structured into these sections:
- Log in to the Directory Front End Interface (DFI)
- Accessing ASPSP and/or TPP records
- Creating Software Statements
- Creating a Certificate Signing Request (CSR) for OB ETSI like and OB non-ETSI certificates
- Managing Transport and Signing Test Certificates including QWACs and QSeals (eIDAS certificates)
- Managing signing and encryption keys
- Creating Software Statement Assertions (SSA)
- Creating ASPSPs’ lists of Authorisation Servers
- Acquiring Access Tokens to consume API services
- Acquiring the list of Authorisation Servers
- Creating Software Statement Assertions (SSA) via API
- Using DFI features via API
The guide is intended for:
- ASPSP/TPP Primary Technical Contacts
- ASPSP/TPP Secondary Technical Contacts
- TSP Primary and Secondary Technical Contacts
3. Getting Started Checklist
Before you begin, it is highly recommended to go through this section first to ensure that you have all the relevant details;
- You have been added to the Open Banking Directory as a Primary Technical Contact or Secondary Technical Contact.
- You have installed node.js (latest build): https://nodejs.org/en/download/
- You have the ability to run git on your computer. Git is available for all major operating systems. Git is available from https://git-scm.com/downloads and as a package for all major Open Source operating systems.
- You have read the following:
Document | Description |
|---|---|
| Open Banking JIRA Service Desk | How to record issues and support requests. This document is emailed to participants after enrolment. |
| Open Banking OpenID Dynamic Client Registration Specification v1.0.0 RC2 | This specification defines two mechanisms for registering software with an ASPSP. |
| Directory Specifications | This document provides an overview of the Open Banking Directory, its information architecture and functional capabilities. It links to the Directory API Specification (swagger spec). |
| Open Banking Security Profile – Implementer’s Draft v1.1.2 | This document outlines the differences between the Open Banking Security Profile and the FAPI R+W profile, with clauses and provisions necessary to reduce delivery risk for ASPSP Open ID Providers. |
| /wiki/spaces/WOR/pages/363986945 | This document outlines the set of technical design changes required to the Open Banking Directory Platform with regards to the use of eIDAS certificates for cross-party identification. It outlines the technical components and the expected changes providing the requirements it should adhere to, in order to support the compliance of its participants and enable a well-functioning OB ecosystem. |
| /wiki/spaces/WOR/pages/616300677 | This document outlines the set of technical design changes required to the Open Banking Directory Platform to enable support for API based enrollment of TPPs with regards to the use of eIDAS certificates for cross-party identification. It outlines the technical components and the expected changes providing the requirements it should adhere to, in order to support the compliance of its participants and enable a well-functioning OB ecosystem. This will be used to inform the detailed design and implementation activities to align the OB Directory Platform with PSD2 Regulatory Technical Standards (“RTS”) and support the related eIDAS requirements. |
5. You will be referred to further documents. Please check that you have access to the following documents and submit a request for access to the Service Desk if you don't:
Document | Description |
|---|---|
| OpenSSL eIDAS PSD2 Certificate Signing Request Profiles v2.1 |
This document outlines the general procedure to generate Certificate Signing Requests (CSR) for Open Banking Public Key Infrastructure (PKI). It focuses on the method required to generate a CSR for Open Banking ETSI like certificates (OBWAC, OBSeal). It includes configuration files to generate CSRs for OBWAC and OBSeal certificates using OpenSSL. Also, example DER encoded QC Statements for all combinations of PSD2 roles. |
4. Log in to the Directory Front End Interface (DFI)
This section describes how to log in to the Directory Front End Interface using two-factor authentication.
Before you start you must check the following:
- You have been enrolled as an ASPSP, TPP or TSP in the Open Banking Directory. Please refer to the guide to complete enrolment - How To Guide: Enrolling Onto Open Banking.
- You have received a link to the DFI web application. The link should have been sent to the Primary Technical Contact’s (PTC) email address supplied to Open Banking as part of the onboarding process.
- Use either Chrome or Firefox web browsers to login to DFI for the best experience.
- For two-factor authentication, you will need a mobile phone (IoS or Android) with the Ping ID app installed. You can download the app from the Apple App Store or Google Play Store.
Steps to log in to the DFI
Step 1: Click on the link sent by Open Banking. (Note: this access is for the Primary Technical Contact specified in the submitted enrolment form)
Step 2: Go through the “Setting up your password” screens as described in the document - How To Guide: Enrolling Onto Open Banking.
Step 3: Follow the instructions on the screen to log in to the DFI web application.
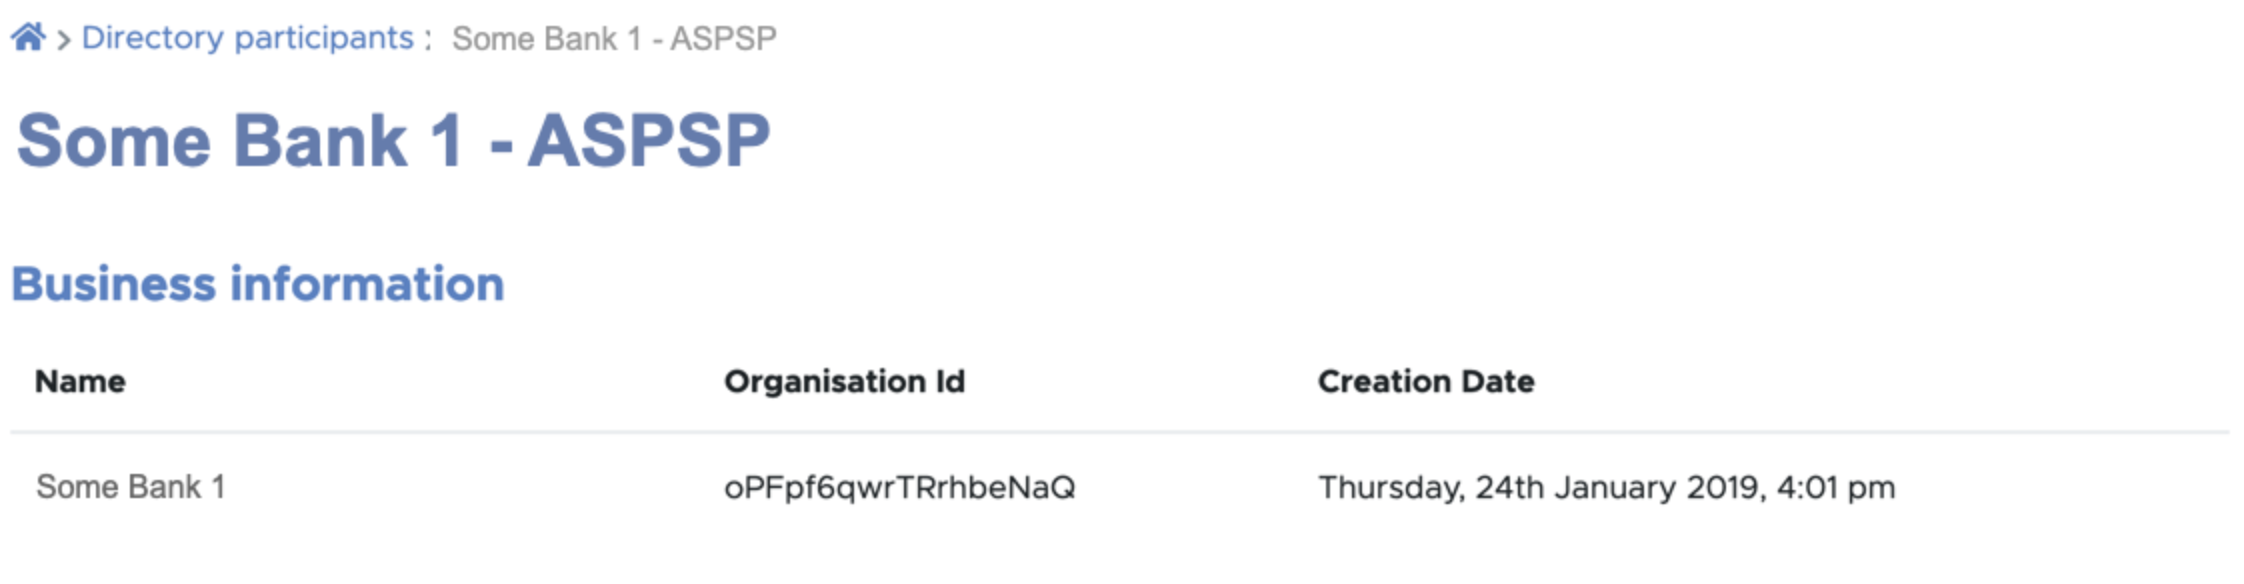
5. Access your ASPSP or TPP Records
Once you've logged in to the DFI, you will see a list of directory participants.
Steps to identify your participant
Step 1: Once you log in to the DFI you will see a list of ASPSP/TPP.

Step 2: Click on the particular row (or > button) corresponding to your ASPSP/TPP. This will open up the summary page for your ASPSP/TPP.
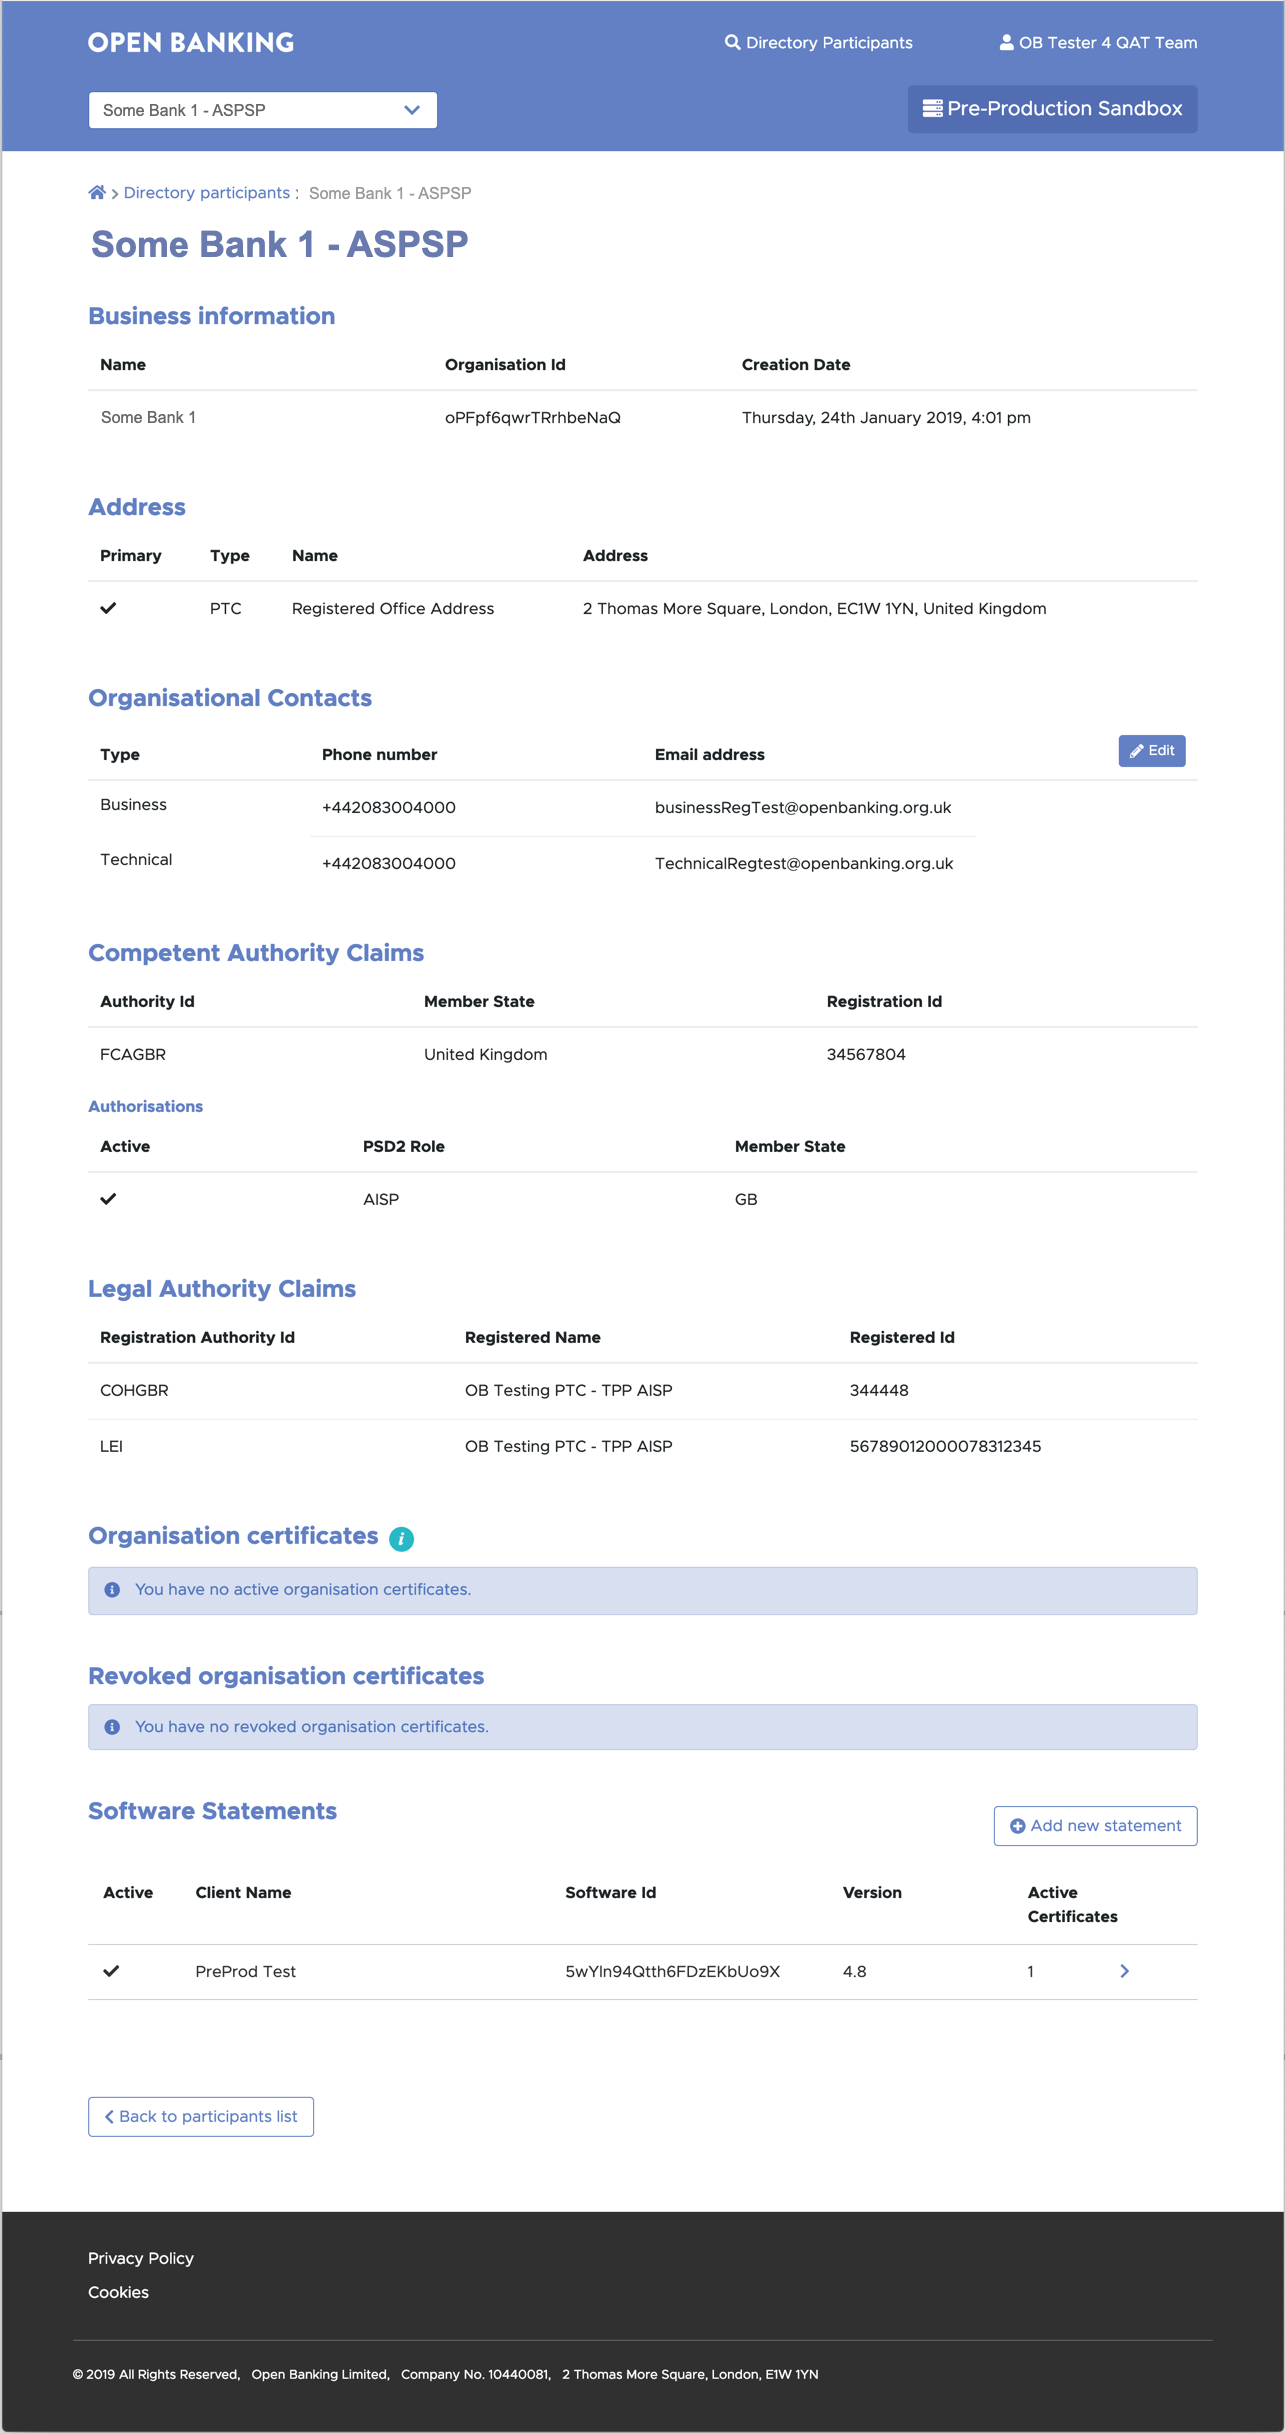
If you do not see your ASPSP/TPP in the list, then enter your ASPSP/TPP name or ID and click on search. From the search results click on the row (or > button) corresponding to your ASPSP/TPP. This should open up the summary page for your ASPSP or TPP.
Note: TPPs can see a list of ASPSPs, but not other TPPs. ASPSPs can see a list of all TPPs and ASPSPs. PTC and STC details can only be seen by PTCs or STCs of the same organisation.
6. Create Software Statements
In order for TPPs and ASPSPs to communicate with each other they need to create Software Statements that uniquely identify their application. This section explains the steps to create Software Statements.
Before you start
- You are viewing the summary page for your ASPSP or TPP.
Steps to Create Software Statements
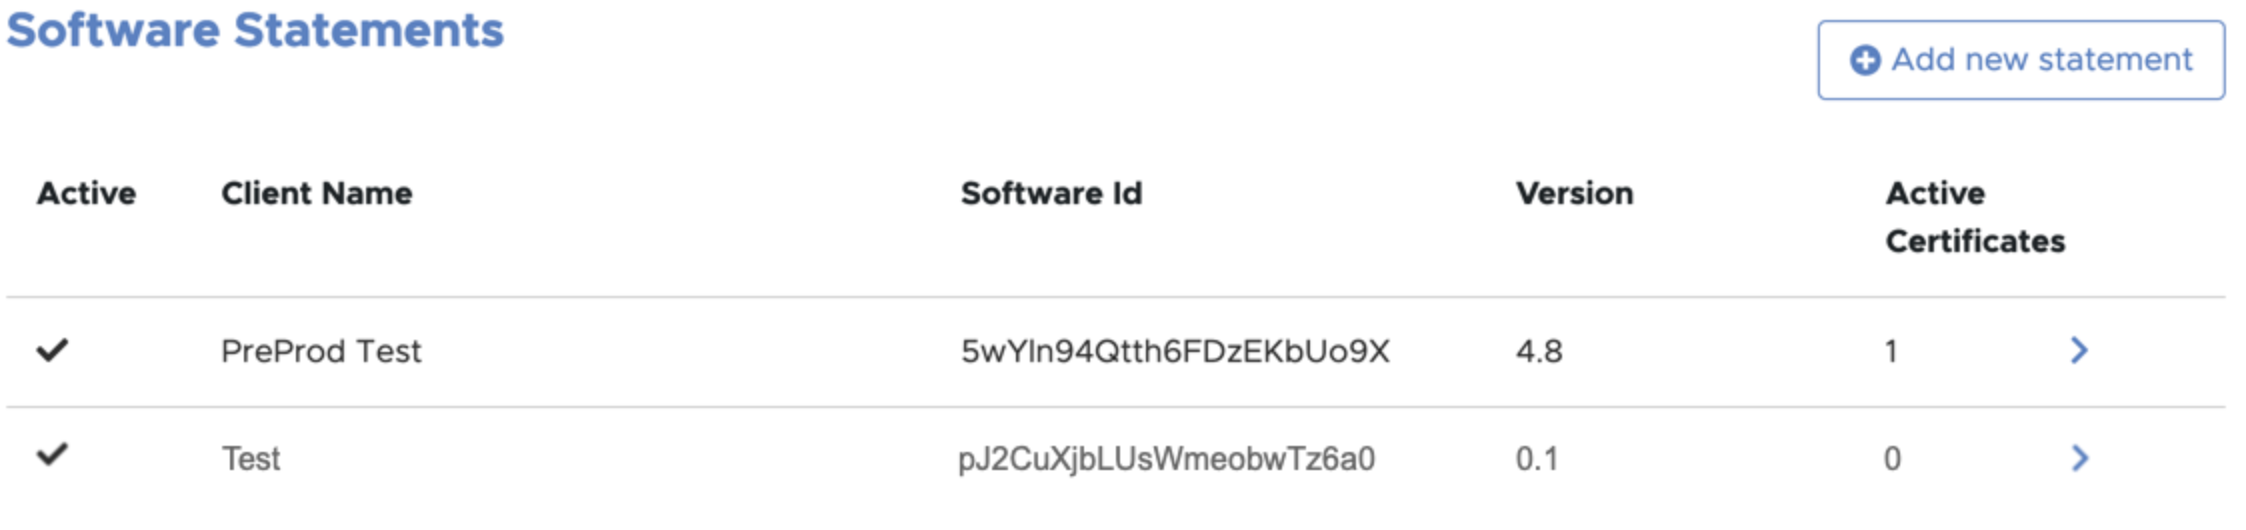
Step 1: Scroll down to the Software Statements section
Step 2: Click the Add new statement button.

Step 3: Complete the Add new Software Statement form as shown below:
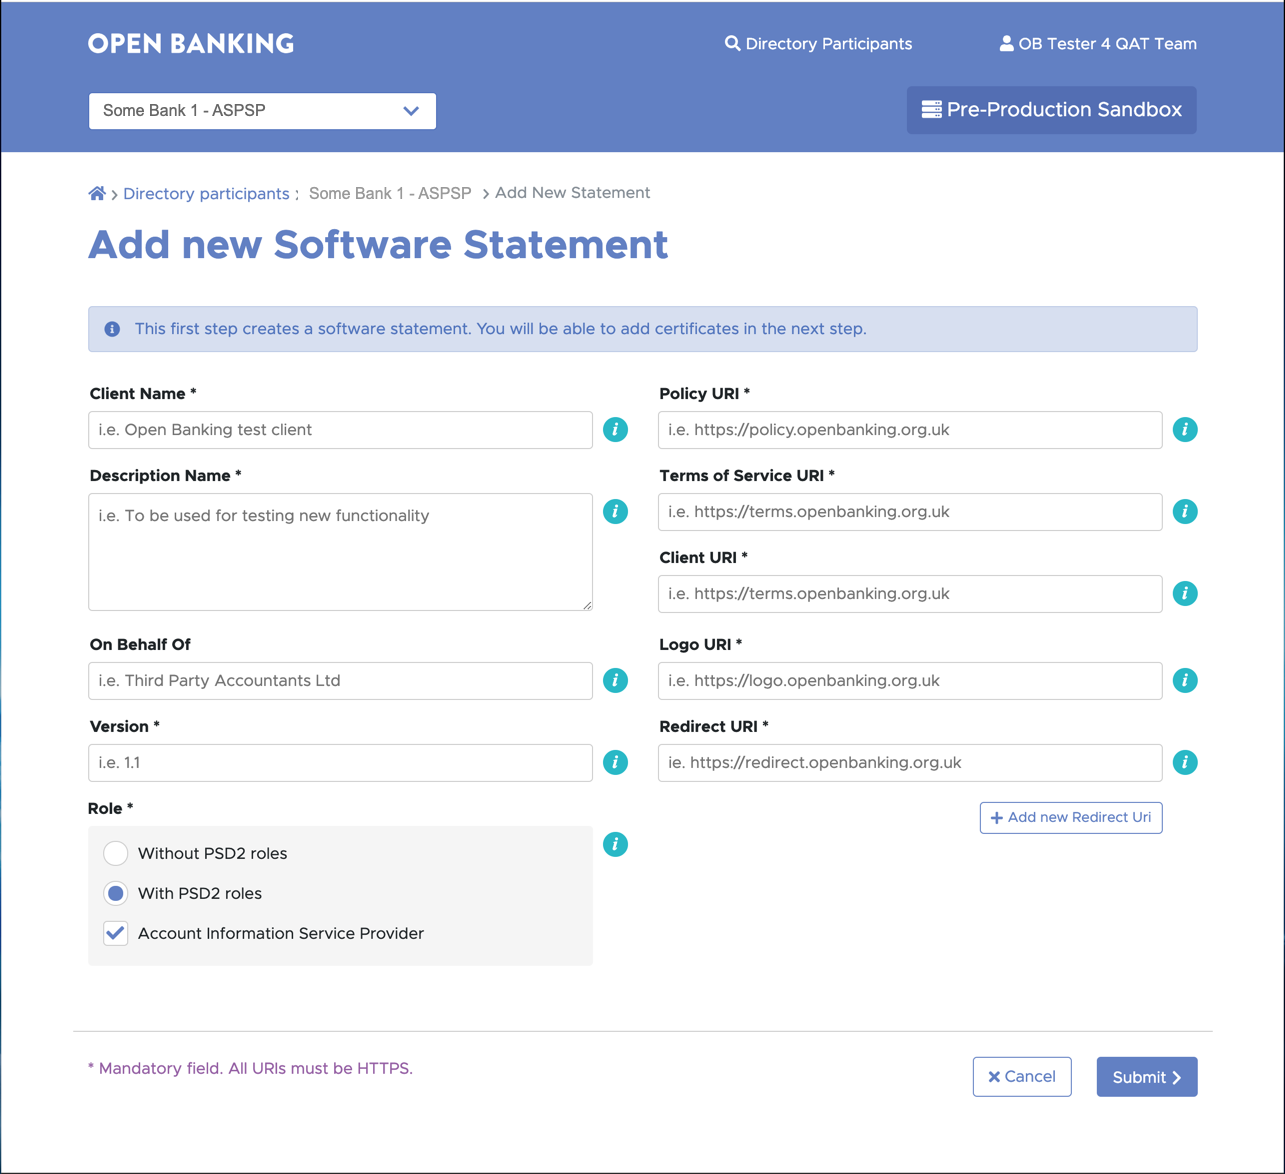
| # | Notes | Description | Example |
|---|---|---|---|
| 1 | Client Name | Must be set to a text string of your choice. During the PSU consent flow, ASPSPs will display this field as the company trading name requesting access to PSU data. Ensure the name provided is representative of the trading name of the organisation. The trading name should be a name that is registered at your National Competent Authority (NCA). | Example: ACME Limited Maximum length: 40 characters. |
| 2 | Description | Must be set to a text string of your choice. | |
| 3 | The On Behalf Of attribute supports Onward Provisioning | The “On Behalf of” field enables the TPP to provide the details of their agent to the ASPSP by including these within the payload. The ASPSP can then present this information to the PSU by displaying both the agent’s name and the regulated TPP’s name. The CEGs* require that if the customer-facing entity is acting on behalf of a TPP as its agent, the TPP must make the PSU aware of this relationship. The “On Behalf of” field is classified as optional for implementation, however, it is encouraged that:
*Currently this is a CEG requirement for AISPs only | Example : The Regulated party is ACME, a registered TPP enrolled onto the Open Banking Directory. They wish to identify another party, ABC Agent, who is an agent acting on behalf of ACME who directly interacts with the ASPSP/ PSU on behalf of ACME. ACME would like the PSU to be informed about ABC Agent in the domain of their ASPSP and would therefore input ABC Agent in the On Behalf Of field. |
| 4 | Version | Software Version must be set to a numeric value, an integer (e.g. 1) or a floating-point number (1.2, 2.2, 3.2 etc.). | |
| 5 | Role | Default shows PSD2 role as selected based on the organisation's PSD2 roles as registered on enrollment. A TPP may have a several roles and can select one specific role for the software statement or all the registered roles. No role - this can be selected to create a software statement with an Oauth client that can be used to monitor APIs, but without the risk of it being misused to transact with Read/Write APIs. | |
| 6 | Policy URI | Must be set to a text string that represents a single Policy URI. | |
| 7 | Terms Of Service URI | Must be set to a text string that represents a single Terms of Service URI. | |
| 8 | Client URI | The website or resource root URI. | |
| 9 | Logo URI | Link to the TPP logo. Note: ASPSPs are not obliged to display images hosted by third parties. | |
| 10 | Redirect URI | Redirect URIs must be set to a text string that represents a single redirect URI. Wild cards are not allowed; port numbers are not allowed - defaults to https/port 443. | |
| 11 | Additional Redirect URIs | Additional Redirect URIs can be added by clicking the Add Redirect URI. | |
| 12 | Continue | Click the Continue button to create a new software statement. | |
| 13 | An OAuth client will be generated automatically | See Step 5: Client Id |
Step 5: Verify that the new Software Statement has been created. It should appear on the summary page for the ASPSP or TPP.
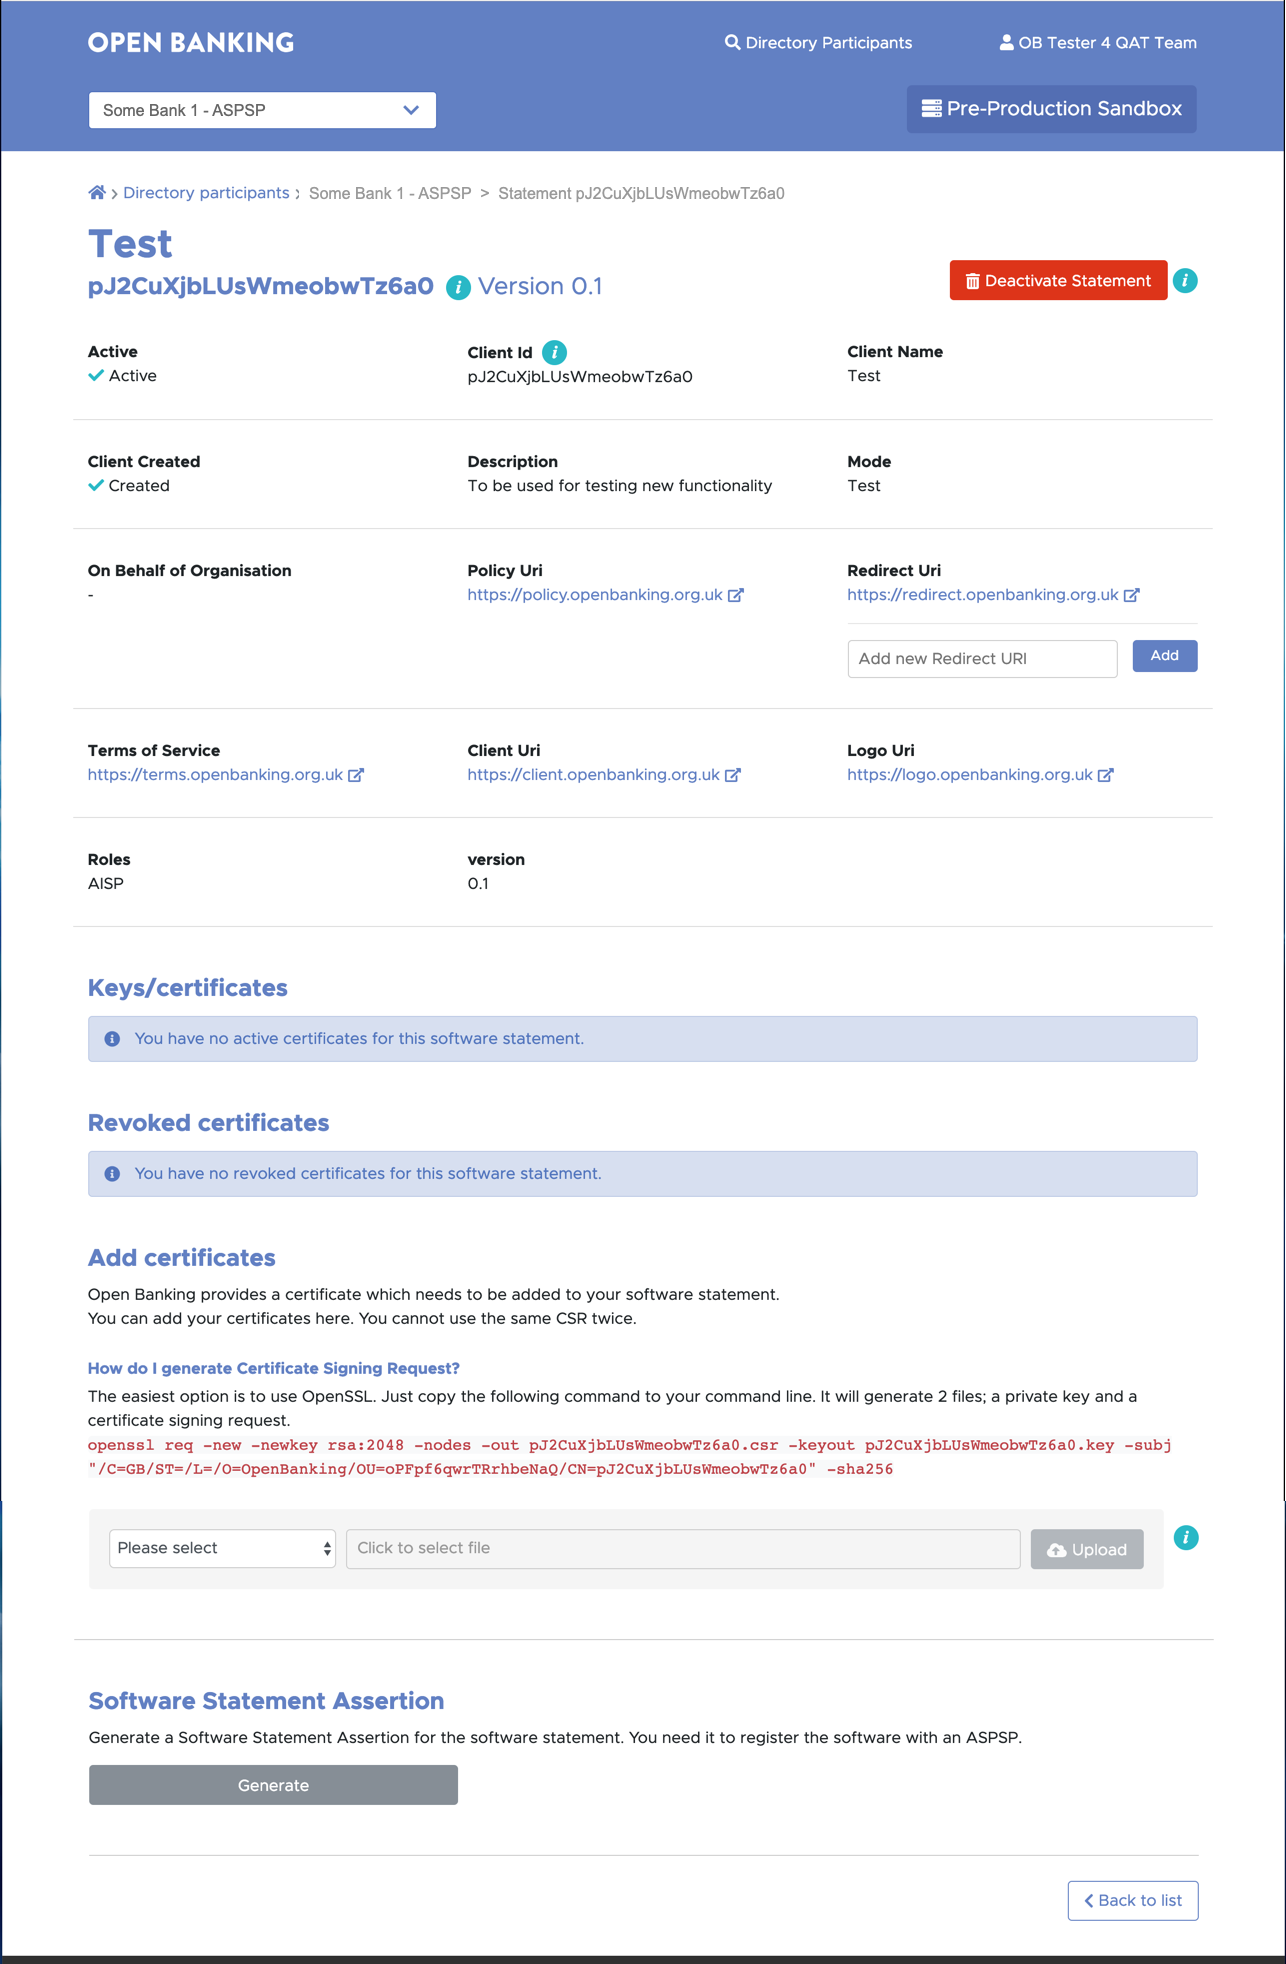
# | Notes |
|---|---|
| 1 | The software statement ID (software_id) appears below the software statement name (i.e Test in the above example). |
| 2 | The OAuth client ID (software_client_id) is the Client Id. |
| 3 | The software statement ID and OAuth client ID are given the same value. |
| 4 | To deactivate software statement click on the Deactivate Statement button. |
| 5 | If it has individual transport and signing certificates they will be automatically revoked and moved into the revoked JWKS and PEM stores in the case of OBWACs/OBSeals and OB non-ETSI certificates. QWACs and QSeals will be automatically removed and moved into the revoked JWKS and PEM stores. |
| 6 | If it has individual signing keys and/or encryption keys they will be automatically removed and moved into the revoked JWKS and PEM stores. |
| 7 | The Deactivate Statement button is replaced with an Activate Statement button. |
| 8 | To reactivate the software statement click the Activate Statement button. The transport and signing certificates will have to be generated manually in the case of OBWACs/OBSeals and OB non-ETSI certificates. OBWACs, OBSeals, signing and encryption keys will have to be reassociated with the software statement. |
7. Create a Certificate Signing Request (CSR) for Open Banking non-ETSI certificates
ASPSPs and TPPs need to create digital certificates to encrypt messages over the public network, and sign requests. In order to create certificates, ASPSPs and TPPs need to create certificate signing requests. This section explains the steps to create a certificate signing request for Open Banking non-ETSI certificates.
Before you start
- You have created a Software Statement for your Organisation.
- You know the Software Statement Id as shown on the software statements screen.
- You know the Organisation ID of your organisation as shown on the Business Information screen.
Steps to create CSR
Using your own key generation and management policies, a public private key pair must be created. The following is an example using OpenSSL and is for illustration purposes only.
Unix and Mac Users
Open the text terminal window (command line) on your computer and run the following command:
openssl req -new -newkey rsa:2048 -sha256 -nodes -out <software_statement_id>.csr -keyout <software_statement_id>.key -subj "/C=GB/O=OpenBanking/OU=<organisation_id>/CN=<software_statement_id>"Note: Keep O set to OpenBanking
The DN should be "/C=GB/O=OpenBanking/OU=<organisation_id>/CN=<software_statement_id>". There should not be any other fields in the DN.
Windows Users
- Install a bash shell emulater.
- goto the directory you want to create the CSR.
Open the text terminal window (command line) on your computer and run the following command:
openssl req -new -newkey rsa:2048 -sha256 -nodes -out <software_statement_id>.csr -keyout <software_statement_id>.key -subj "//C=GB\O=OpenBanking\OU=<organisation_id>\CN=<software_statement_id>"Note: Keep O set to OpenBanking
The DN should be windows escaped "//C=GB\O=OpenBanking\OU=<organisation_id>\CN=<software_statement_id>".
All Users
You will need to create two private keys and two CSRs - one for the transport certificate and the other for signing certificate.
The following table summarises the fields you will need to set in your CSR. If you add values to additional fields in your CSR tool, eg. State, the CSR will be rejected on upload.
Logical Field Name | Expected Values | Description |
|---|---|---|
Signature Hash Algorithm (signatureHashAlgorithm) | sha256 | |
| Country (C) | GB | C=GB |
| Organisation (O) | OpenBanking | O=OpenBanking |
| Organisational Unit (OU) | <OrgID> | OU=The unique identifier for the organisation. |
Subject Common Name (CN) | <SoftwareID> | CN=The Software Statement ID (SSID) for the software statement that the certificate has been created for the software |
X509v3 extensions: X509v3 Subject Alternative Name: | <Comma separated list of DNS names> | All TPPs and ASPSPs must use the OB issued certificates for their MATLS endpoints that are for OB parties. The organisation can include multiple DNS qualifed domain name(s) as a comma seperated list. |
8. Generate and manage Transport and Signing Certificates for Open Banking non-ETSI certificates
TPP and ASPSPs need to create digital certificates to encrypt messages passing over the network between the participants (ASPSP/TPP) and OB network. This section explains the steps to create digital Open Banking non-ETSI certificates.
Before you start
You need to have,
- a transport certificate CSR
- a signing certification CSR, and
- both the CSRs are generated from two different private keys
Steps to Create Certificates
Step 1: On the ASPSP or TPP summary page click on the > to the right of the newly created Software Statement.
Step 2: Scroll down to the Add certificates section and upload the CSR to generate the Transport certificate. On upload the generated transport certificate appears in the Certificates section.
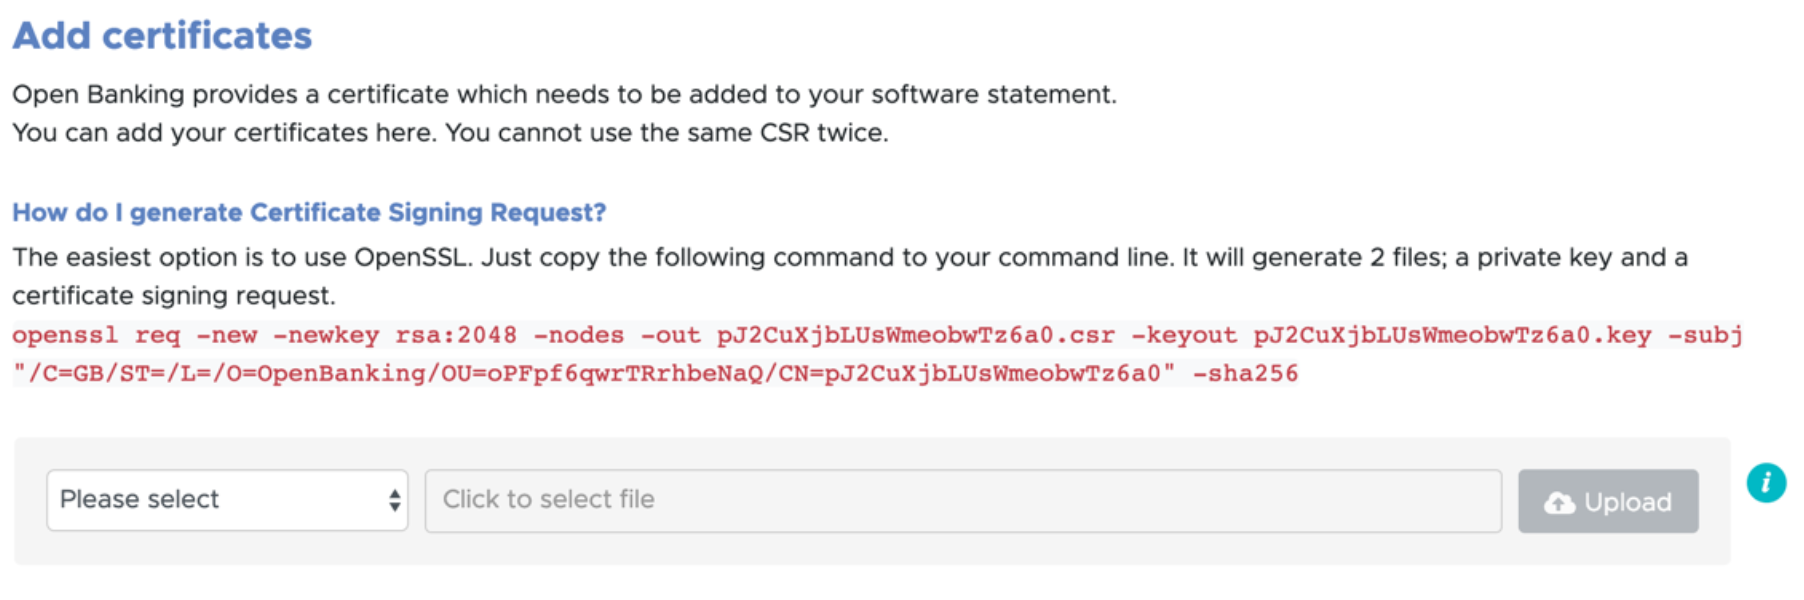
Step 3: Upload the file for the OB Signing Certificate.

Step 4: Click on the 3 dots on the right, and then click on Get PEM to download the certificates.
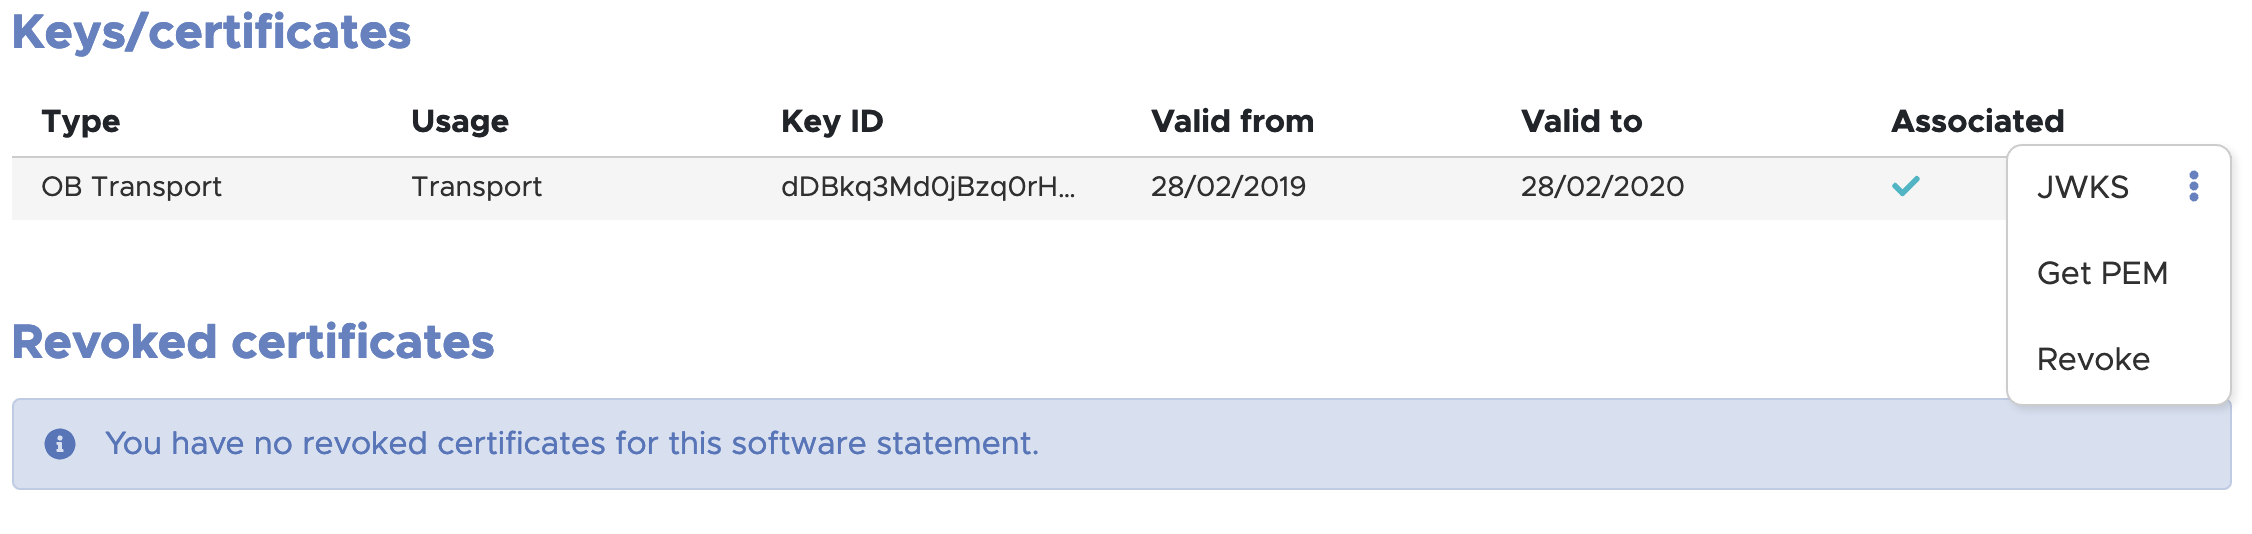
If you need to revoke a certificate, click on the Revoke button to revoke the certificate.
9. Generate and manage Transport and Signing Certificates for Open Banking ETSI certificates (OBWAC and OBSeal)
The Open Banking Certificate Authority allows the generation and management of transport and signing certificates that have an ETSI profile, consistent with the structure of their equivalent eIDAS certificates (QWACs and QSeals).
Before you start
- You are viewing the summary page for your ASPSP or TPP. Unlike Open Banking non-ETSI certificates, the OB ETSI certificates are not generated at the software statement level/screen, they are generated at the organisation level on the organisation's summary screen.
Steps to create CSR
To generate a valid CSR for an OBWAC or OBSeal please follow the instructions in the OpenSSL eIDAS PSD2 Certificate Signing Request Profiles v2.0.
Please note:
- If you use the obdatat tool referred to in Section 12 to successfully acquire an access token: '-nodes' must be added to the Openssl CSR generation command.
- If you copy and paste a QcStatement DER encoded line into your config file: line breaks or whitespaces may be introduced, which may invalidate your CSR.
Generate and manage OBWAC and OBSeal certificates
On the summary page for your ASPSP or TPP, scroll down to the Organisation Certificates sections and upload your CSR for either an OBWAC or OBSeal. The following shows the Organisation Certificates section with several OBWACs and OBSeals.
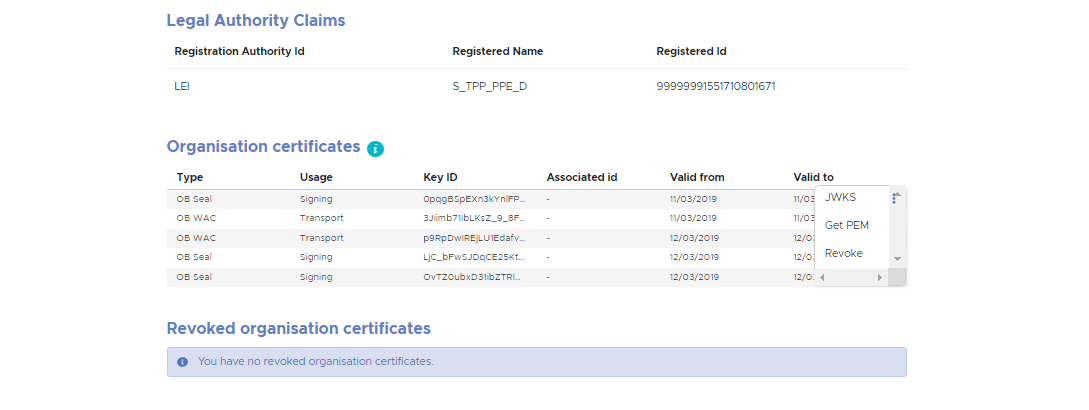
To the right of each certificate is a menu option (three stacked dots). Click on these and three options appear:
- JWKS - a link to the JWKS file
- Get PEM - a link to the PEM file
- Revoke - click to revoke the certificate
To associate an OBWAC or OBSeal certificate to a Software Statement select it to navigate to the Software Statement's detail screen. In the above case, the Keys/certificates section appears as follows:
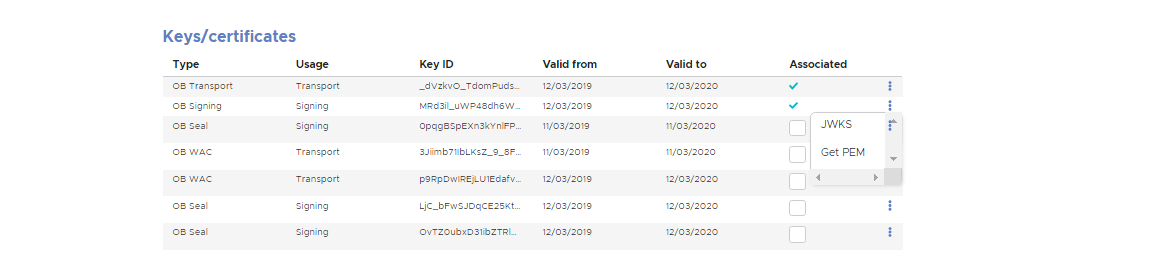
The certificates can be associated by selecting the check box for them. Note, OBWAC certificates can be associated to all Software Statements or just one Software Statement. OBSeal certificates can only be associated to one Software Statement.To dissociate a certificate from a Software Statement simply uncheck the Associated check box.
10. Upload and manage QWAC and QSeal (eIDAS) certificates
The Open Banking Certificate Authority allows the upload and management of QWAC and QSeal certificates.
Before you start
- You are viewing the summary page for your ASPSP or TPP. QWAC and QSeal certificates are not uploaded on the Software Statement screen, they are uploaded at the organisation level on the organisation's summary screen.
Manage QWAC and QSeal certificates
On the summary page for your ASPSP or TPP, scroll down to the Organisation Certificates sections and upload your QWAC and QSeal certificate. To associate a QWAC or QSeal certificate to a Software Statement select it to navigate to the Software Statement's detail page. The certificates can be associated and dissociated in the same way OBWACs and OBSeals in the section above. Note, QWAC certificates can be associated to all Software Statements or just one Software Statement. QSeal certificates can only be associated to one Software Statement.
11. Upload and manage signing and encryption keys
Instead of the signing certificates mentioned above, signing keys can be used. On the Software Statement's detail page for your ASPSP or TPP, scroll down to the Keys/certificates section and upload your signing key. The certificates can be associated and dissociated in the same way OBWACs and OBSeals in the section above. Note, signing keys can only be associated to one Software Statement.
Encryption keys can be associated and dissociated in the same way as signing keys.
12. Create a Software Statement Assertion (SSA) signed by Open Banking
As a TPP you will need to create a software statement assertion and submit it to ASPSP to receive valid client credentials. These credentials are then used to access any Personal Service User (PSU) resource from the ASPSP. SSAs are essentially JSON Web Tokens (JWT) issued and signed by Open Banking.
There are two ways to generate Software Statement Assertions:
- SSA generation using DFI Portal, described in this section
- Dynamic SSA generation using the API, described in section 13. Create a Software Statement Assertion (SSA) using an API call
Before you start
- You have created a Software Statement for TPP software that you want to register with an ASPSP.
Steps to create a Software Statement Assertion
Step 1: Go back to the ASPSP or TPP summary page and click on the newly created Software Statement.
Step 2: Scroll down to the Software Statement Assertion section and click the Generate

Step 3: The SSA is displayed and can be copied to the clipboard. It can be used to on-board the associated Software Statement with an ASPSP. The plain text contents are also displayed.
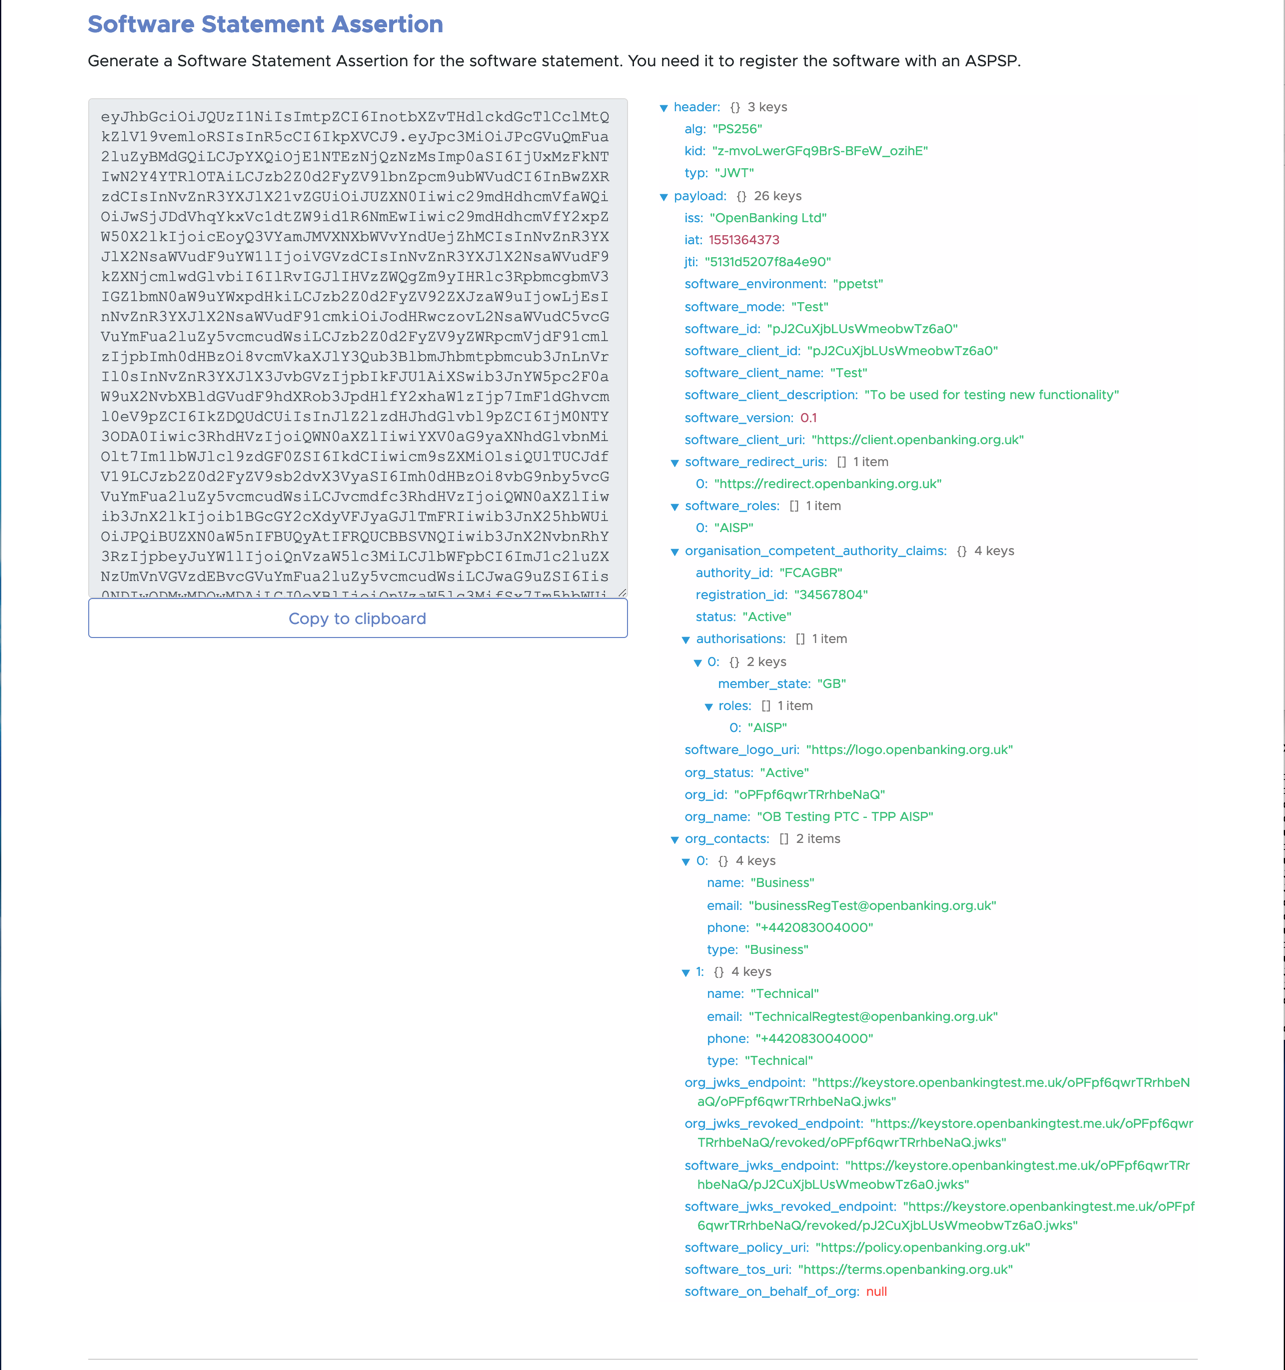
Notes:
- Open Banking Ltd.’s signature can be verified using the JWKs store located at https://keystore.openbankingtest.org.uk/keystore/openbanking.jwks
- Open Banking’s Root and Issuing Certificates can be found at OB Root and Issuing Certificates for Directory Sandbox
- If your certificate is missing in your software jwks, it is most likely because you have not associated the certificate with the particular software statement
13. Acquiring an Access Token to access Open Banking Directory APIs
To access Open Banking Directory APIs you will need an access token. This section describes the steps required to acquire access tokens.
Before you start
- Latest Long Term Support (LTS) version of Node.js and git installed on the computer used to acquire the access token.
- You have read the obdatat Readme file on git https://github.com/OpenBankingUK/obdatat/tree/env-sandbox. For Directory Sandbox please make sure you clone or download the env-sandbox branch.
- Run the following command from the command line:
- git clone git@github.com:OpenBankingUK/obdatat.git
- Run the following command from the command line:
- cd obdatat
- Run the following commands from the command line:
- npm install
Steps to acquire access tokens
Step 1: Make sure you are in the obdatat directory.
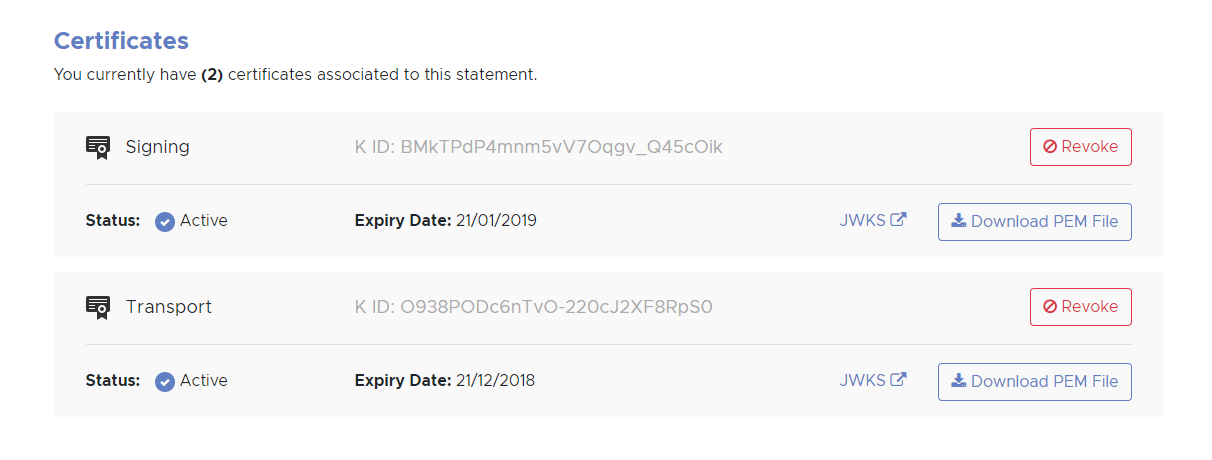
Step 2: Copy the two private keys generated in Create Certificate Signing Request (CSR) – one for the signing certificate, one for the transport - to the relevant files in obdatat config folder replacing their empty equivalents (privateKeySigning.key, privateKeyTransport.key).
Step 3: Download the PEM files from the DFI for the signing and transport certificates. Upload them into the config folder replacing their empty equivalents (certSigning.pem, certTransport.pem)
Step 4: Edit obdatat/config/config.json and set the values of its keys as follows:
- SoftwareStatementId — the Software Statement ID (software_id) of the software statement created in Create Software Statements.
- Client Scopes — one of the following, matching the type of your organisation:
- for a TPP, use ASPSPReadAccess TPPReadAccess AuthoritiesReadAccess
- for an ASPSP, use ASPSPReadAccess TPPReadAll AuthoritiesReadAccess
- Key ID (K ID in image below) — the value of the kid parameter associated with the signing certificate generated in Generate a Transport/Signing Certificate Pair. (Please note that you need to use the signing certificate kid)
- TokenUrl — https://matls-sso.openbankingtest.org.uk/as/token.oauth2
- tppTestUrl — https://matls-api.openbankingtest.org.uk/scim/v2/OBAccountPaymentServiceProviders/
Example
{
"softwareStatementId": "6Rj1EIORw6cRB3q3x1YVgg",
"client Scopes": "AuthoritiesReadAccess ASPSPReadAccess TPPReadAll",
"keyId": "tH9CjyQ-kbJBZpPx81cp-CVny-o",
"tokenUrl": "https://matls-sso.openbankingtest.org.uk/as/token.oauth2",
"tppTestUrl":https://matls-api.openbankingtest.org.uk/scim/v2/OBAccountPaymentServiceProviders/
"aud": https://matls-sso.openbankingtest.org.uk/as/token.oauth2
}
Note: MATLS connections require the use of the host name; using the IP address will not result in a successful connection.
Step 5: Run the following command from the command line:
- npm start
The command will return an access token that can be used to access Open Banking Directory Services’ APIs. (see screenshot below)
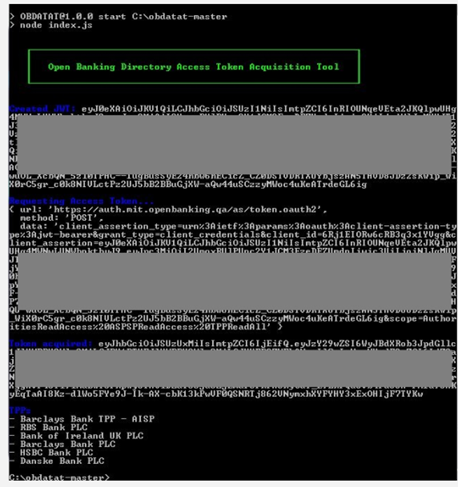
Please note that Open Banking have provided the obdatat tool to help you understand how to acquire an access token. You can use any HTTP client that supports HTTPS and MATLS.
14. Create a Software Statement Assertion (SSA) using an API call
Software Statement Assertions can also be created using APIs provided by Open Banking, an alternative to manual SSA creation via the DFI. This section explains the steps to create SSAs using the API.
Before you start
- You have created a Software Statement.
- You have a HTTP client that supports HTTPS with MATLS.
Steps to create a Software Statement Assertion using API
Acquire an Access Token (see section 10. Acquiring Access Token).
Make a HTTP GET call using the access token and relevant scope to:
https://matls-ssaapi.openbankingtest.org.uk/api/v1rc2/tpp/<org_id>/ssa/<software_id>
org_id must be the Id of the TPP/ASPSP for which you want to generate an SSA.
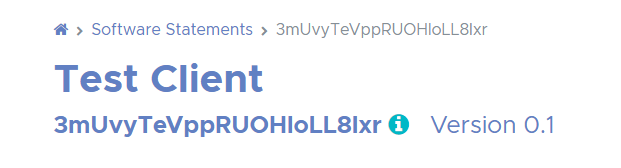
software _id must be set to the Id of the Software Statement for which you want to generate an SSA; this is displayed under the Software Statement title at the top of the page (see below).
Client Scopes — use one of the following, matching the type of your organisation:
- for a TPP use TPPReadAccess
- for an ASPSP use ASPSPReadAccess
15. Creating and managing ASPSP Authorisation and Resource Servers
As an ASPSP you can add URIs so that TPPs can find your authorisation servers and other end points. This can be done by using the “Add well-known URI” feature provided to ASPSPs. This section details the steps required to create and manage authorisation servers.
Before you start
- You are an ASPSP. You are viewing the summary page for your ASPSP.
Steps to add well-known URI
Step 1: Login to the system, select your ASPSP and scroll down to the Well-known URI section.

Step 2: Click on the Add new URI
Step 3: Enter the details.
Step 4: Click Submit button.
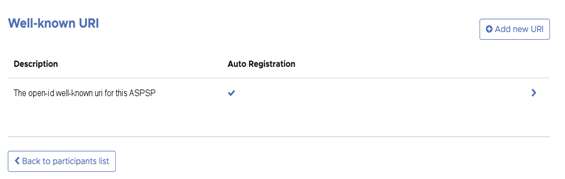
Notes:
- To edit the details click Edit URI button. (You can edit individual URIs.)
- To delete the details click Delete URI button. (You can delete individual URIs.)
- ASPSPs that have multiple brands can enter a Well-known URI per brand.
- ASPSPs can also enter a URL that defines their functional APIs using the input field labelled API Resource Discovery Endpoint.
- For ASPSPs who have created a discovery file using the discover file specification or the OBIE Functional Conformance Tool, please see this guide (https://bitbucket.org/openbankingteam/conformance-discovery/src/master/) on how to use this file as an API Resource Discovery Endpoint.
16. Acquiring the List of ASPSP Authorisation and Resource Servers
As a TPP you can get access to the authorisation servers of individual ASPSPs. This section explains how to retrieve ASPSP authorisation servers using Open Banking APIs.
Before you start
- You have acquired an access token - see Step 10 above (Acquiring Access Token).
Steps to acquire ASPSP authorisation servers
Step 1: Send a HTTP GET request to
https://matls-api.openbankingtest.org.uk/scim/v2/OBAccountPaymentServiceProviders/
using Authorization: Bearer <access_token>
Bearer goes into the Authorisation header to obtain the list of ASPSPs
Step 2: Iterate over the response and filter for the AuthorisationServers
Notes:
- ASPSPs may provide a URL that defines their functional APIs using the input field labelled API Resource Discovery Endpoint.
- This information will be returned with the AuthorisationServers data.
17. Using the Open Banking Directory APIs
Functionality that was previously only available via the DFI can now be accessed via Open Banking APIs:
- manage organisation contacts (CRU)
- manage software statements (CRU)
- generate software statement assertions
- upload/manage signing keys
- upload/manage encryption keys
- generate/manage OB non-ETSI certs
- generate OBWAC/OBSeal certs
- upload eIDAS QWAC/QSeal certs
The above require the generation of an organisational OAuth client. The Dynamic Client Registration (DCR) service generates an organisational OAuth client. A full list of services is available on the /wiki/spaces/WOR/pages/1111785878 page.
To understand how to use the API, please read the Directory API Swagger specification. This is an attachment to the /wiki/spaces/DZ/pages/997065488.
18. Support
All queries, issues or support requests need to be routed through JIRA Service Desk (JSD) (see Open Banking JIRA Service Desk for guidance on how to report a query or issue).
JSD will be monitored throughout each day - Monday to Friday, 8am to 6pm UK time - and issues raised will be responded to as follows:
- Urgent Support Requests: As they occur depending upon priorities
- Queries: Daily morning triage will assign and respond according to priorities
- Bugs: Daily triage will assign and respond according to priorities
Any critical blocking bugs will be addressed as they occur depending upon priorities.
19. Definition of Terms
| Term | Description |
|---|---|
| Open Banking Limited (OB) | The Open Banking Implementation Entity is the delivery organisation working with the CMA9 and other stakeholders to define and develop the required APIs, security and messaging standards that underpin Open Banking. |
| Account Servicing Payment Service Provider (ASPSP) | Account Servicing Payment Service Providers provide and maintain a payment account for a payer as defined by the PSRs and, in the context of the Open Banking Ecosystem are entities that publish Read/Write APIs to permit, with customer consent, payments initiated by third party providers and/or make their customers’ account transaction data available to third party providers via their API end points. |
| Third Party Providers / Trusted Third Parties (TPP) | Third Party Providers are organisations or natural persons that use APIs developed to Standards to access customer’s accounts, in order to provide account information services and/or to initiate payments. Third Party Providers are either/both Payment Initiation Service Providers (PISPs) and/or Account Information Service Providers (AISPs). |
| Technical Service Provider (TSP) | An unregulated Technical Service Provider who will only have access to the Directory Sandbox. |
| Payment Initiation Service Provider (PISP | A Payment Initiation Services Provider provides an online service to initiate a payment order at the request of the payment service user with respect to a payment account held at another payment service provider. |
| Payment Service Provider (PSP) | A legal entity (and some natural persons) that provide payment services as defined by PSD2 Article 4(11) |
| Account Information Service Provider (AISP) | An Account Information Service provides account information services as an online service to provide consolidated information on one or more payment accounts held by a payment service user with one or more payment service provider(s). |
| Payment Service User (PSU) | A Payment Services User is a natural or legal person making use of a payment service as a payee, payer or both |
TPP Primary Technical Contact (TPP-PTC) | A Primary Technical Contact is an individual nominated by a TPP to have access to the Directory and will be able to nominate other Directory technical users. This should be a main point of contact on technical configuration and a senior member of staff with responsibility for the management of the Open Banking digital identity. |
TPP Secondory Technical Contact (TPP-STC) | A person that carries out technical operations on behalf of a TPP. A TPP-STC has the same permissions as a TPP-PTC except for the ability to nominate other Directory technical users. |
ASPSP Primary Technical Contact (ASPSP-PTC) | A Primary Technical Contact is an individual nominated by the ASPSP to have access to the Directory and will be able to nominate other Directory technical users. This should be a main point of contact on technical configuration and a senior member of staff with responsibility for the management of the Open Banking digital identity. |
ASPSP Secondory Technical Contact (ASPSP-STC) | A person that carries out technical operations on behalf of an ASPSP. An ASPSP-STC has the same permissions as a ASPSP-PTC except for the ability to nominate other Directory technical users. |
| Software Statement | A description of a TPP Client Application stored by OB and whose infomation is distributed to ASPSPs using an SSA. |
| Software ID | Unique identifer for a TPP Client App that is scheme wide and can be used to revoke a TPP Client App. |
| Software Statement Assertion (SSA) | Software Statement Assertion represents a formalized assertion describing a TPP Client Application. It includes claims such as Client Name, Redirect URL etc. The SSA is emphermal and is short lived. |
For further information on the terms used within this document please refer to the Glossary on the Open Banking website at www.openbanking.org.uk
© Open Banking Limited 2019 | https://www.openbanking.org.uk/open-licence | https://www.openbanking.org.uk